Working with Multi Value Choice Fields from SharePoint list in InfoPath
One of my colleagues was working on a SharePoint solution where he has a master data list. This list has a choice column with email addresses. The choice column allows multiple selections.
His task was to create an InfoPath form which uses this master data list as a secondary data source. The end user should be able to select one of the list items from a drop down. After the user has selected an item and saved the InfoPath in a form library a workflow should run and send an email to all email addresses which are stored in the choice column. He was not allowed to use source code in his InfoPath form.
In this post I would like to show you how you can extract data from a choice field where a multiple selection is enabled. I will show you how you can transfer an array (multi value choice field) to a string, so you can use it in a SharePoint Designer (SPD) workflow. Let’s get started ….
Initial problem with multi value fields in InfoPath
The problem is as old as InfoPath is. The rules engine in InfoPath is not well designed to work with repeating tables/sections. InfoPath action “Set field’s value” can only copy single value fields and if you try to use this action on a repeating table, this will only copy the first element, all other elements will be ignored.
Initial environment
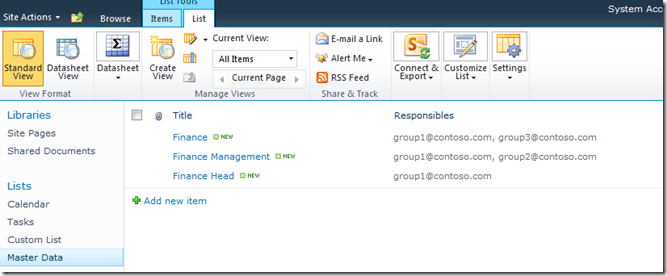
For my demonstration I’ve created a simple custom list in SharePoint and have added a choice field to my list. At the end my “master data” list which I will use as secondary data source in InfoPath looks as follows:
After adding this list to an InfoPath form template the secondary data source looks as displayed in the picture below. Small blue-white triangle near “:Value” shows us, that this field is a repeating field. As I mentioned above we won’t be able to extract all data from this field using InfoPath rule engine.
The Plan
As we now know, InfoPath is not good at handling repeating fields if you are not allowed to use source code. To achieve our goal we will
- Create a single line text field “Responsibles_flat” on the “master data” list
This field will be used in InfoPath because it can be handled well by InfoPath rule engine. - Copy selected values from choice field to “Responsible_flat”
We will create a small SPD workflow to copy values from the choice field to “Responsible_flat” field automatically after “master data” item has been created, or updated. - Use “master data” list in InfoPath form as secondary data source
- Clean up the value of “Responsibles_flat” field
The raw value in the “Responsibles_flat” can’t be used directly as an email recipients value. We need to clean up the string so it can be used as email recipient in an email.
Solution
- Create a single line text field “Responsibles_flat”
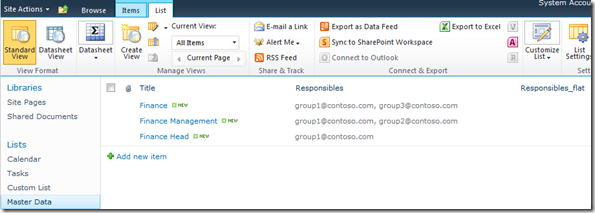
- Copy selected values from choice field to “Responsibles_flat”
To copy the values we will create a workflow in SPD and configure it to run after a new item has been created, or updated in the “master data” list.Open your site, where “master data” list is stored, in SPD.
Select “List and Libraries” from the left and click on the “master data” list to open list details.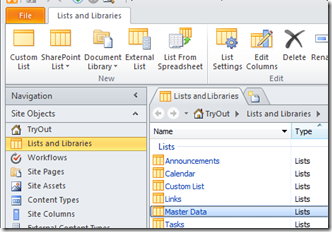
After you’ve opened the details page you will see, that your ribbon has changed. Now you are able to create a workflow which will be attached to the list.
To create a workflow click on: “List Workflow” button in the Ribbon.

Give your workflow a name, type a small description and click “OK”.

Our workflow will run after a new item has been created or an existing item has been updated. In our workflow we will update our item and copy values from our choice field into the text field, this will cause the workflow to run again and again and again.
To avoid a never ending loop we will compare our value which we would like to copy to the text field with the value which is already there. If they are equal we will skip the copy activity. This will stop the loop.
Our first activity will be to copy the value from our choice field in to a workflow variable. Click into “Step1” of your workflow and start type “Set”. SPD will inform you that there are 10 results available which match your text. Press “Enter” and you will see all workflow actions where you can select from.
Select a workflow action named “Set workflow variable”.
Your workflow should look as follows:
Click on “workflow variable” to create a new variable of type “String”.
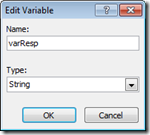
Click on “value” and then on
 icon to select the field which will be copied to the new workflow variable.
Select the choice field from current item.
Make sure you’ve selected “Choice, Comma Delimited” in “Return field as” field.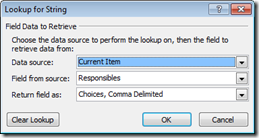
Now we will compare the value of our variable with the value of the field “Responsibles_flat”.
Click belong your first action in your workflow and type “If”, press “Enter” and select the action “If current item field equals any value”.
Click on “field” and select “Responsibles_flat”.
Click on “equals” and change it to “not equals”. Remember we want to copy the string only if "Responsible_flat” is not equals “Responsibles”.
Click on “value” and then on icon to select the variable which we’ve created before.
Your workflow should look as follows:
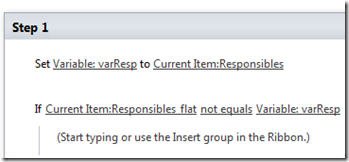
Click on “(Start typing or use ….” text to add an activity inside the if statement. Type “update” and press “Enter”. This will add “Update item” action to your workflow. Click on “this list”, a dialog will appear.
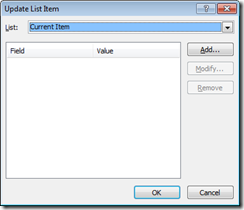
Click on “Add” button and set the value for “Responsible_flat” field. Click “OK”
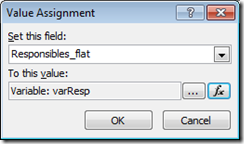
At the end your workflow should look like this one:

Click “Publish” in the ribbon so you can test your workflow. With actual settings the workflow will not run automatically on any changes to our “meta data” list. Make the first test manually on one of the items.
After your workflow runs your item should look similar to this screenshot:
The columns “Responsibles” and “Responsibles_flat” look almost the same. The big difference is in the type of the column and how they can be used in InfoPath.
After successful test go back to SPD and change the settings for your workflow. Set “Start Options” of your workflow as shown in this screen and publish your workflow again.

NOTE: If you are testing your workflows under “System Account” they wont start automatically. You will receive an exception in your SharePoint logs like follows. Test your workflows always with a user account.
Declarative workflows cannot automatically start if the triggering action was performed by System Account. - Use “master data” list as secondary data source in an InfoPath form
Now we’ve prepared our “master data” list so we can use it in our InfoPath form. In our use case we will copy the value of “Responsibles_flat” to a field of our InfoPath form. Further it will be used in another workflow to send an email. I wont cover this workflow in this post but if you have questions on this topic feel free to contact me.My sample form contains only two fields in the Main data source:
EmailRec – Textfield where we will store email addresses from item of “master data” list which was selected by user.
dpRep – Dropdown field which is connected to the secondary data source.The secondary data source should look as follows:
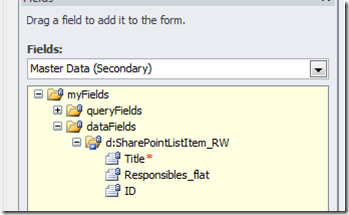
My drop down field “drpResp” stores “ID” of an item as value and displays “Title”. Make sure that you stores an “ID” as value, otherwise you want be able to select right email addresses for “EmailRec”.
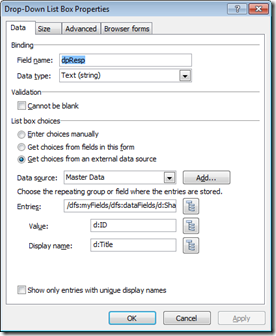
To fill our form field “EmailRec” with the value of “Responsible_flat” column we need to add a rule to our dropdown field.
Select your dropdown field in the form and click on “Add Rule” in the ribbon. Select “This Field Changes” from the list and click on “Set a Field’s Value” action.
Select “EmailRec” field from main data source as “Field” and click on formula icon near “Value” field.
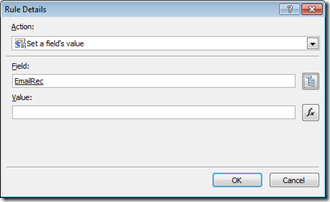
Now we need to select the right value from our secondary data source. Our meta data list contains several items. To find the right value we need to filter the list.
Click on “Insert Field or Group …” button and select “Responsible_flat” from your secondary data source. DO NOT CLICK “OK” YET.
Click “Filter Data…” This will allow us to get the right value from our “Meta Data” list. If we do not filter we will always receive the first item from the list.
Click on “Add” button in the dialog.
Select “ID” from the left drop down. This “ID” represents the “ID” of secondary data source.
Select “drpResp” from main data source for the right drop down.

Click “OK” on all opened dialogs and test your form in a preview. Select an item from the drop down and your “EmailRec” field should display a value from “Responsibles_flat” field.
- Clean up the value of “Responsibles_flat” field
As you can see, the values in “Responsibles_flat” are separated by a “,”. This might cause an error on your email server. Most of the servers needs “;” as delimiter between recipients. We need a small adjustment on our rule to make our string look well.Click on the “Set a field’s value EmailRec=…” action we’ve added before to modify it.

Click on the formula icon near “Value” field.
SELECT existing formula text, so it appears to be marked and click on “Insert Function …” button.
(You need to select the existing formula text so it will be automatically integrated into the function we will select in the next step.)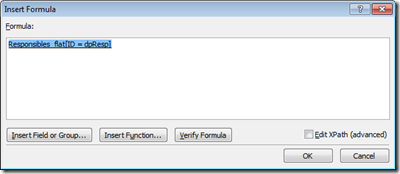
From function dialog select “Text” from the left list, and “translate” from the right and click “OK”.

As you see, the “translate” function needs three parameters.
* text – text to be analyzed
* find_chars – characters to be replaced
* replace_chars – new characters to be inserted instead of find_charsAfter you’ve clicked on “OK” your formula should look as follows. Two parameters are missing.
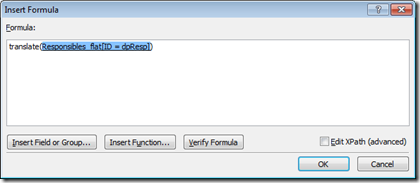
Add missing parameters to the formula so it looks at the end as follows. Remember we want to replace “,” with “;”

Click on “Verify Formula” button to be sure you updated the formula in the right way.
Click “OK” after your formula contains no errors.Verify your form in the “Preview” mode. The delimiter between email addresses is now “;” and will be accepted by our email server.


First of all I want to say great blog! I had a quick question that I’d like to ask if you don’t mind.
I was curious to know how you center yourself and clear your mind before writing.
I have had difficulty clearing my thoughts in getting my thoughts out.
I truly do take pleasure in writing however it just seems like the first 10 to 15 minutes tend
to be lost simply just trying to figure out how to begin.
Any ideas or hints? Many thanks!
Hi Juergos,
thanks for nice words. I dont have any simple answer to your question. All my blog entries are detailed answers to questions I am getting in my daily Job. So try to solve only one problem in a blog entry.
bg Andrej
Thanks for posting this, helped me with lookup field comparison in infopath !
Nice solution to a problem that shouldn’t exist.
Hi Andrej, great blog. I saw your name in one of the MS forums, so thought I will aslk you my question. One of my clients in the field is trying to use an browser-based InfoPath form. In the first view of the form they select a value from drop-down and click “Next”. They are getting “Critical error. An error occurred submitting this form to the Web server.” error. I on the otherhand can login as that client and open and submit the form without any issues. Do you have any ideas about this one?
Environment: InfoPath 2010 – Browser based.
Hi Ricky,
sorry for late response.
So you are running an InfoPath form on your onpremise SharePoint, right?
What happens in click event of the “next” button? Are there rules defined, or is there a source code execution behind the click Event?
Your user, where the form is working fine, is an Administrator user on the SharePoint site?
If you are usind data Connections in your form and have stored them in a data Connection library. make sure you have enabled/approved this data connections.
bg Andrej
Thanks for the reply Andrej. I was able to resolve the issue and it was very simple. Client was using IE10 which apparently wasn’t compatible. Using compatibility mode IE9, he was able to access the form.
This is a great idea, but isn’t working for me against a drop down list in a Document info Panel in Word. It only allows me to bring back a String, not Choices. I’m trying to set adrop down field using the SP Designer workflow. I’m using Set Field in Current Item and while the proper values are displayed in Designer, it errors out with “The workflow could not update the item, possibly because one or more columns for the item require a different type of information.” Any help is certainly appreciated!
Thanks,
Josh
Hi Josh,
are you trying to update a “Choice Field” from your workflow? In my post I am describing how to use a choice field in an InfoPath form or WF with a Workaround using a “temp” string field.
bg Andrej
Thanks – my problem was that there was validation on the field that I wasn’t aware of and it would error out because the value wasn’t permitted. Of course SharePoint’s workflow error log doesn’t report the same error that the validation produces, or even anything that would tell you it’s validation. I just stumbled on it. Maybe in 2016…
Get filtered values from SharePoint list column in InfoPath text field –
http://www.sharepointbreak.com/2012/12/06/get-filtered-values-from-sharepoint-list-column-in-infopath-text-field/
Hi – I’m wondering if there is a way to go the other direction? I have a client-based IP form with multiple select fields. I need these to not be a single string so that each value can be a refiner in the search refinement. I already have a field that is a comma-delimited string but sharepoint still sees it as one value. The only ideas I have are (1) recreate it as a list and lose the repeating sections or (2) use workflow to populate a list that I would use in the search to direct users the IP form (questionable). Ideas??
Thanks in advance,
Josh M
Hi Josh,
How do you submit your data from the IP form on client into your SP List?
bg Andrej