Prevention of duplicate entries based on two or more columns in a SharePoint list
SharePoint 2010 has a lot of improvements compared to SharePoint 2007. One of this improvements is the possibility to create unique constraints on a column in a SharePoint list.
This constraint is valid only for one column, but sometime you need to ensure that your unique constraint includes two or more columns.
The best way to create a multi column unique constraint is to implement an event receiver for the list. (http://msdn.microsoft.com/en-us/library/ff728093.aspx)
To be clear: An event receiver is the best way to avoid double entries in your list because it called every time your list item is changed regardless of the origin of the change.
To implement an event receiver you need to be familiar with visual studio, and be able to deploy source code solution to your site collection. An event receiver can be implemented as sandbox solution. In this case it can be deployed to Office365 also.
Solution for business users (no code)
In this post I would like to demonstrate a solution for an multi column unique constraint which can be implemented by a business user, who is not familiar with visual studio or is not allowed to deploy a sandbox solution to the site collection.
This approach will work only if the user enters data through the SharePoint UI. The approach I will demonstrate will not work for updates through source code, or through data sheet view. If you need to cover all possible input channels you need to implement an event receiver.
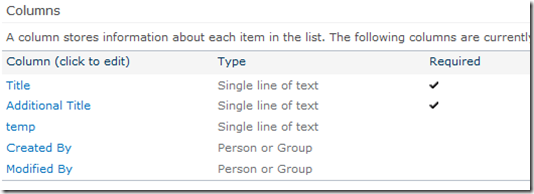
In our case we have a list “Cust List” with two columns “Title” and “Additional Title”. Our goal is to implement a unique constraint including this two columns to prevent a normal user to save duplicate entries in the list.
Please note that there is a column called “temp” we will need this column during this lab to raise an error if the constraint is violated.
SharePoint 2010 allows you to customize edit and display forms for list item through InfoPath.
- Edit form in Infopath
Click on “Customize Form” in the Ribbon. - Add secondary data source to your form
To be able to check for existing entry with same values for “Title” and “Additional Title” we need to check the list before saving a new entry to it. For this purpose we need a "secondary data source” pointing to “Cust List”.To add a secondary data source to your form click on “From SharePoint List” button in the “Data” tab:

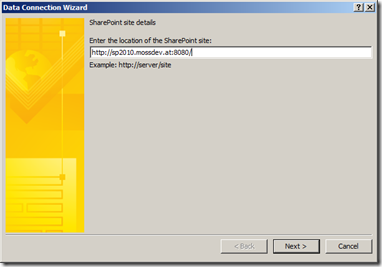
Type in the URL to the SharePoint site where your list is stored and click next.
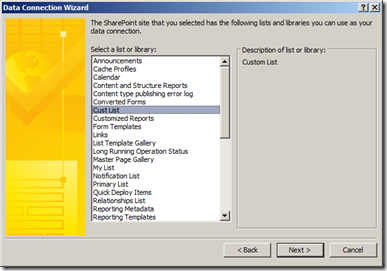
Select the list, in my case it is “Cust List”, from the listbox and click “next”
Select only “Title” and “Additional Title” from the list, so the amount of data we will get from the secondary data source is as low as possible. This will reduce the time to check for a double entry and avoid freezing of the form.
We need to select “Title” and “Additional Title” because we will make a query on this field to retrieve duplicate entries. Click “next”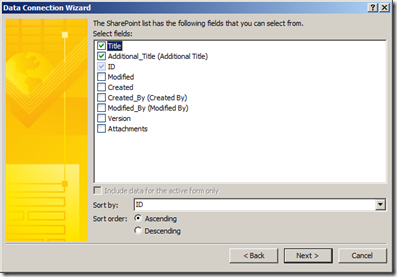
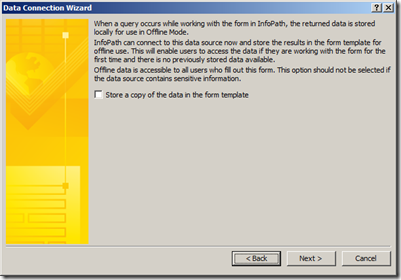
We do not need to store a copy of our data for offline scenario because our form is hosted in the browser, so leave the checkbox empty and click “next”
Give your data source a name and uncheck the checkbox for retrieving data on form load, otherwise all entries from your list will be loaded to your secondary data source while form opens. In a large list scenario it will cause a delay and bad performance of the form.
MAKE SURE YOU UNCHECK THE CHECKBOX. Click “Finish”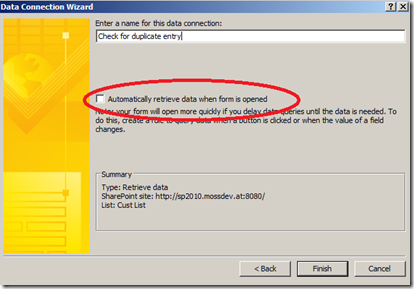
- Creating a rule to check for duplicate entry
After we’ve created a secondary data source to our list, we need to create the rule which will query the list for duplicate entries and prevent user to save actual item if it violates the unique constraint.Reminder: our constraint includes “Title” and “Additional Title” columns/fields.
Select “Title” field in your form and click “Manage Rules” in the ribbon

Click on “New” and select “Action” from the drop down:
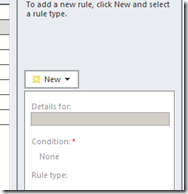
Give your rule a name and set the condition for the rule to run only if “Title” and “Additional Title” are not blank:

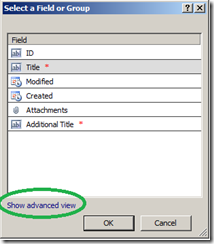
Add “Set field’s value” action to your rule. Select “Title” field of your secondary data source. Default InfoPath displays fields from “main data source”. To select a field from secondary data source click on “Show advanced view”
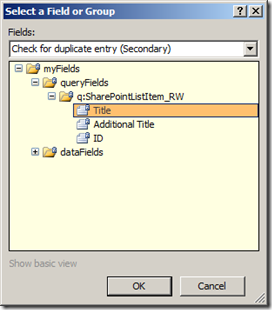
Select your secondary data source from the drop down at the top of the dialog and select “Title” from the “queryFields” node. Click “OK”
Now you should be back to “Rule details” dialog. Click on the button near “Value:” text box.
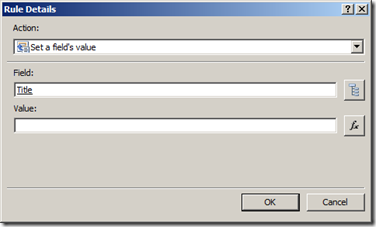
Click on “Insert Field or Group” and select “Title” from “main data source”
Click “OK” until you get back to “Rule details” dialog.
Click “OK” on “Rule details” dialog.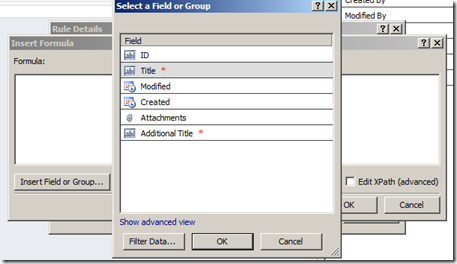
Your rule should contain one action:
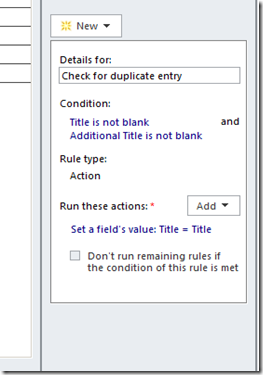
Create same “Set field’s value” action for “Additional Title” field. After you’ve added your second action your rule should look as follows
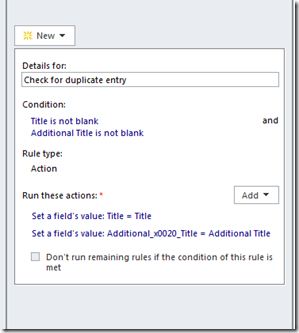
Add “Query for Data” Action to your rule and select your secondary data source.
Click “OK”.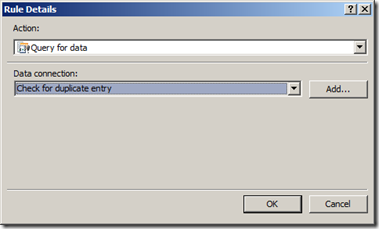
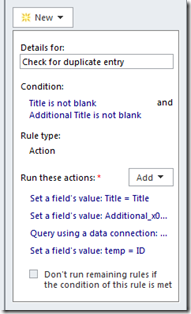
Your rule should look as follows:
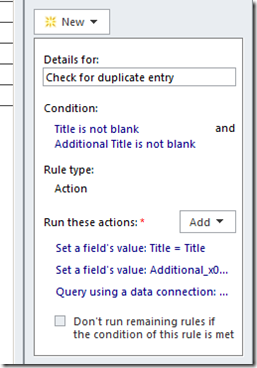
We’ve created a rule which queries our list for duplicate entries regarding our input in fields “Title” and “Additional Title”.
We need to raise an error in the form if a duplicate entry was found by our rule.
- Raise an error if a duplicate entry was found
To raise an error in the form we will use the “temp” field/column. We will update our rule we’ve created in “3.” to populate the field with the ID of the first entry of our secondary data source after we made a query to it.If there are no duplicate entries (query to secondary data source returned no items), the “temp” field will remain empty, otherwise it will contain an ID of the duplicate entry. We will create a “Validation” rule on the temp field to prevent user to save item if “temp” field is not empty.
Select “Title” in your form and add another action to the rule we’ve created in “3.” Add a “Set field’s value” action.
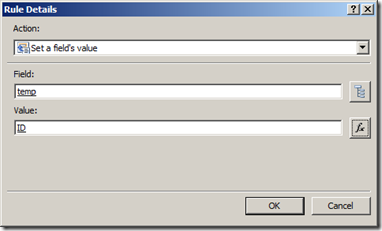
Select “Temp” as field and “ID” from secondary data source as value. Make sure you select the “ID” field from “dataFields” node.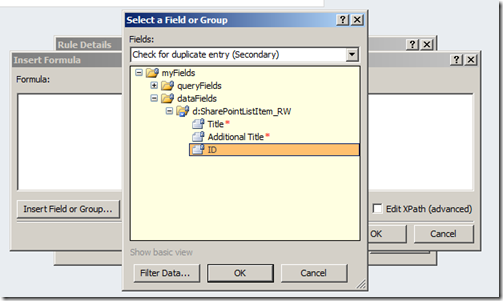
- Copy the rule to “Additional Title” Field
We need to make sure that the check is done after the user changes “Title” or “Additional Title” field. For now, the check is only performed after the user changes the “Title” field.With InfoPath 2010 we can copy rules from one field to another. Thanks god, and program manager of InfoPath who made a decision to implement this feature
 .
. Select “Title” field on your form and click on the “Copy Rule” icon at the top of the rule pane:

Select the “Additional Title” field and paste the Rule. You need to update the rule on “Additional Title” field after you’ve copied it.
After you rule has been copied to the “Additional Title” field the first action “Set field’s value: Title = Title” has been changed. InfoPath is to smart and updates the rule automatically to the field where the rules is copied to. This happens to actions and conditions.
We still need to copy “Title” from our “main data source” to the “Title” – Query parameter of our secondary data source. InfoPath makes changes to the rule which will result in wrong query, and our check for duplicate entry will not work if the user changes “Additional Title” field.
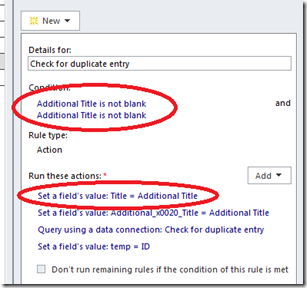
Change first action, and condition so your rule looks as follows:
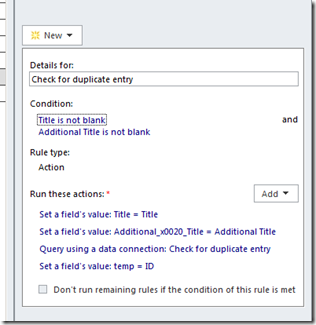
- Complete error handling
Now we are checking for duplicate entries on both fields “Title” and “Addition Title”, we copy an ID of the duplicate entry to our temp field if we find one. Now we need to raise an error, and prevent user saving the form if a duplicate entry exists.To achieve this goal we need to create a validation rule for “temp” field.
Select “temp” field.
Click “New” button in the “Rules” pane and add “validation” rule.
Set up the condition and for your rule and type in the “Screen tip”: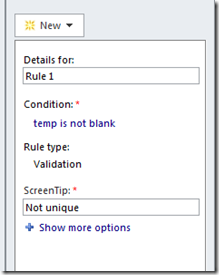
Now we’ve created a validation rule and a user will not be able to save a form which will cause duplicate entries in the list. Now we need to inform the user what kind of error prevent saving the form.
Put “calculated value” field at the top of our form where we will display an error message if necessary:

Type in the error message you would like to present to the user. Make sure you place it inside “…” otherwise InfoPath will try to analyze your text as formula and display an error:

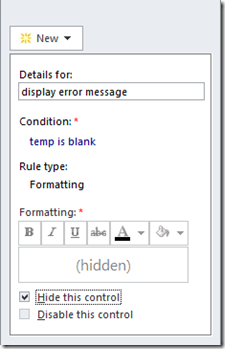
To make sure to display the error message only if a duplicate entry was found create a Formatting rule for the “Calculated value” field:
- Publish your form
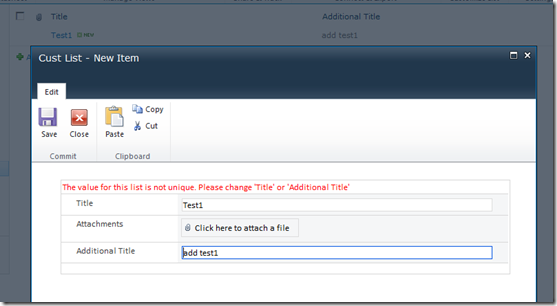
- Verify your form. Insert couple of entries to your list. This approach will work for small lists and for large lists.


Andrej
This worked perfectly, thanks for the detailed post!
Drew
Brilliant! Thank’s a million for that post. Worked like a charm
very informative post…
This is designed for 2010. Can you forward me (or assist) with a 2007 solution?
Hi Eric,
unfortunately I don’t have an environment with office 2007 any more. Which step differs in InfoPath 2007 from my explanation?
Bg Andrej
Fantastic post! I am new to SP and this was incredibly helpful – thank you so much for taking the time to write this out in such an easy to follow way! Worked great for me!
nice! this is awesome
Hi, I tried applying this on a date field. As in my objective is to ensure that the same entry is not made on the same date. I did not get any (got a ..) value when I selected the Date field from the Main path. Please reply it will be very helpful.
Hi Amit,
Even if you have selected the field in SharePoint to store date only there is a time fragment in the field which is not displayed. Date is stored as “2012-07-12T00:00:00” in SharePoint. If you have a date only field in InfoPath your value of the field is “2012-07-1” only. You need to add the time part to your query string. Add a text formula in your rule where you set the query values like this: concat(MyDateField, “T00:00:00”) this will result in propery query string and you will get items which contains this date only.
bg Andrej
Hi, this works perfectly fine using infopath but does not restrict duplicate entries in the datasheet view. Can you assist how to achieve this? Thanks in advance
The only way I can think of is to write an EventReceiver to validate the changes made by the user.
This works like a charm for exact matches, but is there a way to prevent overlapping date periods?
Thanks a lot for detailed post . IT really helped
This works great, but I am having trouble with this with my “Combo-box” setups. I have a second field that is hidden, unless “other” is chosen then a user will enter in information. I have a workflow to add this back in to the connected list, but I would like to also check for duplicates against this. So, once the new item is added to the list, if a user pulls their last record to make a new record, they will no longer need to type in this field, but the other choices they fill in need to be checked again. Ex. Field1–>”other”, Hidden Field1.5-> “New” Item, Field2=1, Field3=2, Field4=3 all submitted. User Pulls record and changes Field1->”New”, so this record is technically the same as before (Field1=New,Field2=1, Field3=2, Field4=3), but using the rules you have outlined above, an error message will not show since The “other” field changed to the new item.
Any ideas?
Thanks,
Ross
Wow wonderful explanation appreciated !!!
Hi!
sounds amazing! do you have a solution for 2013?
It should work the same in 2013
Awesome! It worked like charm even for 2013. Thanks so much!